Saturday, June 29, 2013
Thursday, June 20, 2013
A Belated Birthday Post - Cora's Rainbow and Musical Birthday

Invitations:

I found a ton of rainbow invitations and a ton of music themed invitations, but not one single rainbow and music invitation. So I semi-created my own. I found this cute rainbow invitation, added the music notes, and viola! It turned out super cute!
Name banner:


Water bottle labels:

Cora's invitation had the chevron rainbows on them, so I thought I'd incorporate that into my water bottles. I created these adorable labels and just slapped them on water bottles.
If you like these labels and want to use them for a rainbow birthday party, I created a free template for you to use. Just click here.
If you like these labels and want to use them for a rainbow birthday party, I created a free template for you to use. Just click here.
PB & Jammin' Sandwiches:


Pepperoni Prelude Pizza:

Music School of Fish:

I used a large music note cookie cutter to seperate the rainbow colors from the regular cheese color.
A Fruit Melody:

I used strawberries, oranges, pineapple, kiwi, blueberries, and red grapes to make this fruit tray. The music note is made from black colored candy melts.
Rainbow cupcakes with candy music toppers.


Rockin' Party Favor Bags:

Photography:
Throwing a party can be hectic. You're running around trying to make sure everything is in place, talking to your guest, and sometimes you just want to enjoy the party. All of this makes picture taking impossible. I love having a photographer on hand to capture all of the details and wonderful moments of the party. It's usually my biggest splurge, but its been worth it. Thank you Jamie LeBlanc for taking great pictures for us!
I hope you enjoyed our rainbow and music party. We had a musically good time!

Saturday, June 15, 2013
No Flour Power
When I was pregnant with Julia, I had gestational diabetes. I went to a nutritionist and we discussed the importance of protein to carb ratio. Basicslly, I had to cut down my carb intake. This was very difficult for me because I love bread. Unfortunately bread doesn't love me, so I am always on the lookout for bread substitutes and new recipes to try. This week I came across two great and easy peasy, no flour recipes.
The first item I made is called Oopsie bread. Apparently this recipe is popular with those on The Atkins Diet. I came across this recipie via FaceBook. Yes, it was one of the million recipes that get "shared" so the recipe saves in their photo albums.
The first batch I made, I followed the FB recipe. The bread was very light and airy. It had a very sponge like feel to it. Here's a picture of it.  I liked it, but it was a little too spongy for me. So here is my tweaked version.
Oopsie Bread
(Makes aprox 10 slices)
Ingredients:
4 eggs (separated)
1 tsp baking powder
4 oz cream cheese
Pinch of salt
1 tbsp ground flax seeds
1/2 tbsp chia seeds (optional)
2 tbsp Parmesan cheese (optional)
Preheat your oven at 350.
Separate your eggs. In a large bowl, beat your egg whites and baking powder until you have stiff peaks (about 5 minutes or so). Once that's done set aside.
In a blender (we used a hand blender), blend the remaining ingredients. The first time I made this, I used the mixer, but the blender really breaks down the cream cheese and makes nice smooth batter. Here's my little helper blending the yolks and cream cheese while the egg whites whirl.

Now that it's blended, fold your yolks and cream cheese mixture into the egg whites. Folding can be time consuming, but its important to because if you over mix, you lose the nice air pockets and your bread will be flatter. Don't mix or stir, just fold.
Line your baking sheet with parchment. Even though I have my silpat pictured, I recommend parchment paper. It basically slides off the parchment paper when baked. Ladle about a 1/4 c batter on to the parchment. It should be the size of a hamburger bun. I was able to get 6 on my cookie sheet.

Bake for 8 minutes at 350. They will turn a nice golden color and have cracks on top.

This version is still light and airy, but because I added the ground flax, it was less spongy and gave it more of a bread-like texture. Here is a close up so you can see the texture.

This is a great bread substitute for sandwiches, burgers, hot dogs. Or you can just eat them plain. This week I used them for breakfast sandwiches and a BLT (using oven baked turkey bacon and spinach). Give it a try!

My second wonderful, easy peasy, no flour recipe is for banana pancakes. My aunt sent me this recipe after she saw my Oopsie bread pictues posted on FB. Originally this was suppose to be a 2 ingredient recipe, but of course I tweaked it. Here is my version...
No Flour Banana Pancakes
(Makes aprox 6-8 small pancakes)
Ingredients:
2 eggs
1 banana
1/2 tspn ground flax seeds
1/4 tsp vanilla
Dash of cinnamon
Pinch of salt

Throw all of the ingredients into a blender and blend until smooth. Set your pan or griddle to med/low and lightly spray with oil. Pour a small amount of batter for each pancake. This is a thin batter, so they will be thinner pancakes. Since they're thin, it's best to make small pancakes (easier to flip). I can make 3 pancakes on my small pan, probably 5 on my large pan.

Make sure the batter is mostly cooked before flipping over.

Here is how thin you can expect them to be.

In just a few minutes, you're done and you can enjoy these wonderful pancakes.

Saturday, June 8, 2013
Kale Chips! Betcha You Can't Just Have One
I
I stopped by my aunt's house for a quick visit. Just as I arrived, a fresh batch of kale chips were coming out of the oven. I grabbed a couple and they were oh so good! I've had kale chips before, but these had a nice nutty and spicy taste to them. So I got her recipe and headed to the store for some kale. Here's her recipe...
You need:
1/2 tbsp chia seeds
1/2 tbsp ground flax seeds
1/4 tsp sea salt (I had Himalayan sea salt on hand, but regular sea salt is fine)
1 tbsp salt free seasoning of your choice. (I used Mrs Dash extra spicy for the adults and the garlic and herb for Cora's batch)
1 bunch of Dino Lacinato kale (the flat kind)
Spray olive oil

Preheat your oven at 350.
Mix your dry spices together and set aside.
Then


Next dry your leaves the best you can. I find that a salad spinner works best.
The next few steps are done on small batches.
Toss a handful of leaves in a bowl and lightly spray with olive oil.
Once your leaves are evenly coated, sprinkle your seasoning. Just a light sprinkle should do.
Place leaves on parchment paper. Don't overcrowd your baking sheet or your chips won't crisp easily.

Bake for only 8 minutes at 350 and they're done!

It was hard to get a picture of the full batch because we were munching on these right as they were coming out of the oven.
I hope you enjoy. Betcha can't eat just one!

Tuesday, June 4, 2013
Surprise!

What I thought was going to be another run-of-the-mill office meeting, turned out to be a surprise belated baby shower/ welcome back party for me.


Look at these amazing diaper/baby blanket creations my co-worker did for me.


It was such a sweet gesture. I am lucky to be working with such a great group of people!
Friday, May 31, 2013
The Maternity Party is Over

Well, the party's over and back to work I go. For me, it marks an end of an era. You see, Julia is my last baby,which makes this my very last maternity leave. I know they won't remember this time in their lives, but I will always cherish these memories.
I recorded this little video of Julia the night before I went back to work. I just wanted to remember how she was right at this moment.
- Posted using BlogPress from my iPhone
Tuesday, May 28, 2013
"Mommy, I Do It"
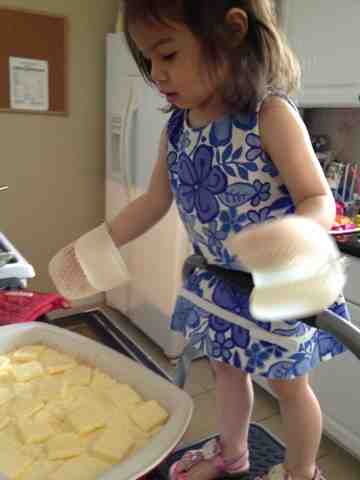
Lately my 2 year old daughter's favorite phrase is, "Mommy, I do it." And boy, does she want to do everything. For Memorial Day, I offered to bring dessert to a barbecue. So since I happened to have all of the ingredients for Dump Cake and the instructions are so easy, a two year old could do it, I decided to let Cora make her first dessert. Here's how she made it...


You need:
- 1 can (21 Oz.) Cherry Pie Filling
- 1 can (15 Oz.) Crushed Pineapple
- 1 box (about 18 Oz.) Yellow Cake Mix
- 1/2 cup Chopped Pecans (optional)
- 1 stick Margarine
- 1/2 stick Butter
Preheat the oven at 350.
While that's heating up, dump your can of cherries in a 9 x 13 pan.
Next, dump your can of crushed pineapple in the pan. You don't need to drain it. Just dump the whole thing in.
Now mix until all of the fruit and juices are combined in fruit harmony.
Now it's time for the cake mix. If you opted to add the pecans, dump the pecans in your cake mix. Then dump the cake mix on top of the fruit. Spread it evenly throughout your pan. Do not mix it in with the fruit. You should have a layer of fruit and a layer of cake mix.
Cut up the margarine and butter into slices. Then distribute the pats of butter and margarine on top of the cake mix.
Of course, after Cora added the butter, I went in rearranged the butter, so it was more evenly distributed. And of course every time I had to assist her, she said, "No mommy. I do it!"
Now your Dump Cale is ready for the oven. Bake at 350 for 45 minutes to an hour.
Don't worry, I didn't really let her put the pan in the oven. She was happy just to have oven mitts.
While ours baked, we cleaned up, had tummy time with Julia, checked in on our cake's progress, and sang songs.
Once it was ready, I took it out of the oven and prepped it to take to the barbecue. Unfortunately we were having a crisis at the time (I'll explain in a minute) and I forgot to take a picture of the fresh-out-of-the-oven cake. Here it is after we got into it. Seriously delicious! It's kind of like a fruit crisp. My husband loves it with a scoop of Blue Bell Homemade Vanilla Ice Cream. By the time we left, the entire cake was gone.
Okay back to my crisis.. Right as we were getting to leave, Cora decided to grab a smoky eyeshadow compact when I wasn't looking. She plopped herself right in the middle of my bed pillows (a favorite spot of hers), and decided to apply it herself. I can just hear her saying, "Mommy, i do it!" I have a white comforter and 2 white pillows. She and my bed were a mess when I found her!
We were so late, but at least her dessert was a hit!
Subscribe to:
Posts (Atom)