Showing posts with label recipe. Show all posts

Saturday, June 15, 2013

No Flour Power


When I was pregnant with Julia, I had gestational diabetes. I went to a nutritionist and we discussed the importance of protein to carb ratio.  Basicslly, I had to cut down my carb intake.  This was very difficult for me because I love bread.  Unfortunately bread doesn't love me, so I am always on the lookout for bread substitutes and new recipes to try.  This week I came across two great and easy peasy, no flour recipes.  

The first item I made is called Oopsie bread.  Apparently this recipe is popular with those on The Atkins Diet. I came across this recipie via FaceBook. Yes, it was one of the million recipes that get "shared" so the recipe saves in their photo albums. 

The first batch I made, I followed the FB recipe.  The bread was very light and airy. It had a very sponge like feel to it. Here's a picture of it.  
I liked it, but it was a little too spongy for me. So here is my tweaked version.

Oopsie Bread 
(Makes aprox 10 slices)
Ingredients:
4 eggs (separated)
1 tsp baking powder
4 oz cream cheese
Pinch of salt
1 tbsp ground flax seeds
1/2 tbsp chia seeds (optional)
2 tbsp Parmesan cheese (optional)

Preheat your oven at 350.
Separate your eggs. In a large bowl, beat your egg whites and baking powder until you have stiff peaks (about 5 minutes or so).  Once that's done set aside.

In a blender (we used a hand blender), blend the remaining ingredients. The first time I made this, I used the mixer, but the blender really breaks down the cream cheese and makes nice smooth batter.  Here's my little helper blending the yolks and cream cheese while the egg whites whirl.

Now that it's blended, fold your yolks and cream cheese mixture into the egg whites. Folding can be time consuming, but its important to because if you over mix, you lose the nice air pockets and your bread will be flatter. Don't mix or stir, just fold.

Line your baking sheet with parchment. Even though I have my silpat pictured, I recommend parchment paper. It basically slides off the parchment paper when baked. Ladle about a 1/4 c batter on to the parchment.  It should be the size of a hamburger bun.  I was able to get 6 on my cookie sheet. 

Bake for 8 minutes at 350. They will turn a nice golden color and have cracks on top.

This version is still light and airy, but because I added the ground flax, it was less spongy and gave it more of a bread-like texture.  Here is a close up so you can see the texture.

This is a great bread substitute for sandwiches, burgers, hot dogs. Or you can just eat them plain.  This week I used them for breakfast sandwiches and a BLT (using oven baked turkey bacon and spinach).  Give it a try!

My second wonderful, easy peasy, no flour recipe is for banana pancakes.  My aunt sent me this recipe after she saw my Oopsie bread pictues posted on FB. Originally this was suppose to be a 2 ingredient recipe, but of course I tweaked it. Here is my version...

No Flour Banana Pancakes
(Makes aprox 6-8 small pancakes)
Ingredients:
2 eggs
1 banana
1/2 tspn ground flax seeds
1/4 tsp vanilla
Dash of cinnamon
Pinch of salt


Throw all of the ingredients into a blender  and blend until smooth.  Set your pan or griddle to med/low and lightly spray with oil.  Pour a small amount of batter for each pancake.  This is a thin batter, so they will be thinner pancakes.  Since they're thin, it's best to make small pancakes (easier to flip). I can make 3 pancakes on my small pan, probably 5 on my large pan.  

Make sure the batter is mostly cooked before flipping over.

Here is how thin you can expect them to be.

In just a few minutes, you're done and you can enjoy these wonderful pancakes.
The sweetness of the banana makes this even great without syrup. And because they're small and packed with protein and potassium, they're great for an afternoon or after workout snack.  Enjoy!

Saturday, June 8, 2013

Kale Chips! Betcha You Can't Just Have One

I

I stopped by my aunt's house for a quick visit.  Just as I arrived, a fresh batch of kale chips were coming out of the oven. I grabbed a couple and they were oh so good! I've had kale chips before, but these had a nice nutty and spicy taste to them. So I got her recipe and headed to the store for some kale. Here's her recipe...

You need:
1/2 tbsp chia seeds
1/2 tbsp ground flax seeds
1/4 tsp sea salt (I had Himalayan sea salt on hand, but regular sea salt is fine)
1 tbsp salt free seasoning of your choice. (I used Mrs Dash extra spicy for the adults and the garlic and herb for Cora's batch)
1 bunch of Dino Lacinato kale (the flat kind)
Spray olive oil


Preheat your oven at 350.
Mix your dry spices together and set aside.

Then
Make sure you wash your leaves well. Especially with organic kale, you may little bugs on the leaves and near the ribs.

Next dry your leaves the best you can. I find that a salad spinner works best.

The next few steps are done on small batches.
Toss a handful of leaves in a bowl and lightly spray with olive oil. 
Once your leaves are evenly coated, sprinkle your seasoning. Just a light sprinkle should do.

Place leaves on parchment paper. Don't overcrowd your baking sheet or your chips won't crisp easily.


Bake for only 8 minutes at 350 and they're done! 

It was hard to get a picture of the full batch because we were munching on these right as they were coming out of the oven.

I hope you enjoy. Betcha can't eat just one!

Tuesday, May 28, 2013

"Mommy, I Do It"

Lately my 2 year old daughter's favorite phrase is, "Mommy, I do it." And boy, does she want to do everything.  For Memorial  Day, I offered to bring dessert to a barbecue. So since I happened to have all of the ingredients for Dump Cake and the instructions are so easy, a two year old could do it, I decided to let Cora make her first dessert.  Here's how she made it...

You need:
  • 1 can (21 Oz.) Cherry Pie Filling
  • 1 can (15 Oz.) Crushed Pineapple
  • 1 box (about 18 Oz.) Yellow Cake Mix
  • 1/2 cup Chopped Pecans (optional)
  • 1 stick Margarine
  • 1/2 stick Butter

Preheat the oven at 350. 
While that's heating up, dump your can of cherries in a 9 x 13 pan.

Next, dump your can of crushed pineapple in the pan.  You don't need to drain it. Just dump the whole thing in.

Now mix until all of the fruit and juices are combined in fruit harmony.  

Now it's time for the cake mix. If you opted to add the pecans, dump the pecans in your cake mix.  Then dump the cake mix on top of the fruit. Spread it evenly throughout your pan. Do not mix it in with the fruit. You should have a layer of fruit and a layer of cake mix.

Cut up the margarine and butter into slices. Then distribute the pats of butter and margarine on top of the cake mix.

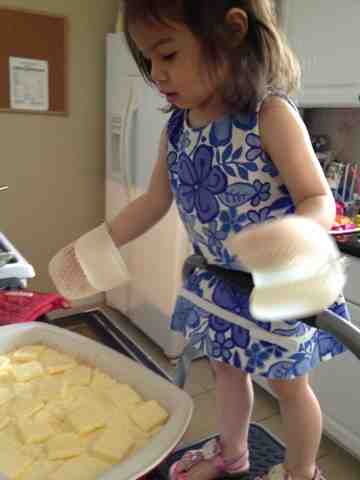
Of course, after Cora added the butter, I went in rearranged the butter, so it was more evenly distributed.  And of course every time I had to assist her, she said, "No mommy. I do it!" 

Now your Dump Cale is ready for the oven. Bake at 350 for 45 minutes to an hour.

Don't worry, I didn't really let her put the pan in the oven.  She was happy just to have oven mitts.

While ours baked, we cleaned up, had tummy time with Julia, checked in on our cake's progress, and sang songs.  

Once it was ready, I took it out of the oven and prepped it to take to the barbecue.  Unfortunately we were having a crisis at the time (I'll explain in a minute) and I forgot to take a picture of the fresh-out-of-the-oven cake.  Here it is after we got into it. Seriously delicious! It's kind of like a fruit crisp. My husband loves it with a scoop of Blue Bell Homemade Vanilla Ice Cream.  By the time we left, the entire cake was gone.

Okay back to my crisis.. Right as we were getting to leave, Cora decided to grab a smoky eyeshadow compact when I wasn't looking. She plopped herself right in the middle of my bed pillows (a favorite spot of hers), and decided to apply it herself.  I can just hear her saying, "Mommy, i do it!"  I have a white comforter and 2 white pillows. She and my bed were a mess when I found her!


We were so late, but at least her dessert was a hit!

Tuesday, July 3, 2012

Avocado Egg Salad


Most work days I come home for lunch and have leftovers, but once in a while our nanny will prepare something for us. Her avocado egg salad is one of my favorites. It kind of a cross between guacamole and egg salad. It's so simple, why didn't I think of it before?

Here's what you need.


1 medium avocado
2 hard boiled eggs (chopped)
1/4 c chopped tomatoes
1/2 tbsp finely chopped red onion
1/2 tbsp finely chopped celery
Chopped cilantro (optional)
Juice of 1/2 of a lime
1/2 tsp garlic powder
Salt and pepper to taste

In a mixing bowl, mash your avocado, then add your eggs, tomatoes, onion, celery, and cilantro. Mix well, then add your lime juice, garlic power, salt, and pepper.


My nanny serves it as avocado tacos on her homemade tortillas, but we've added to our burgers, sandwiches, spread on toast, and used it as dip. Even my toddler loves it!

Enjoy!

- Posted using BlogPress from my iPhone

Wednesday, June 13, 2012

Beating The Heat With A Watermelon Smoothie


Ahhhh Texas summers... They can be brutal. I found that a good way to beat the heat is a refreshing watermelon smoothie. The cute coffee shop around the corner makes wonderful watermelon smoothies, but they can be costly if I go throughout the whole summer. So why not make my own? All it took was:

A blender
2 C watermelon
1/2 C frozen watermelon
1/4 C crushed ice

Delicious!!!!


- Posted using BlogPress from my iPhone

Sunday, June 10, 2012

Recipe: Easy Peasy Chicken Nuggets


You know that yummy, crunchy topping that makes your Thanksgiving green bean casserole taste so good? It also makes great chicken nuggets! Here's my recipe for Easy Peasy Chicken Nuggets.

Ingredients:
2 chicken breast or 5-6 boneless/skinless chicken thighs
1- 6 oz container of french fried onions
1 tbsp of flour
1/2 tsp garlic seasoning
Black pepper to taste
1 egg (slightly beaten)

Preheat oven at 350.

Pour the French fried onions in a large ziplock bag. Take out the air out of the bag so it'll be flat. With a rolling pin, roll over the bag and crush up those onions into small bits and pieces. Add your flour, garlic seasoning, and pepper in the bag and shake to mix it. The coating should look like this...


Slightly beat an egg and set aside. Cut you chicken into 1 inch pieces and then coat them with egg.


Then your chicken in your in the bag to coat each piece and place on a foil lined cookie sheet (it makes cleaning up a snap!)


Once all of the pieces are ready, you may notice that you have extra coating. Don't discard it. Go ahead and spoon the extra crunchy goodness on each chicken piece.


Bake for 20 minutes and they're done!


I'm not a big sauce fan, so I don't serve my nuggets with sauce. Honestly, I think these nuggets have so much flavor, you won't need it. They are always a hit when I've made them for guest. I hope you enjoy them too!

- Posted using BlogPress from my iPhone

Wednesday, June 1, 2011

Molten Chocolate Nutella Pudding Cakes

I had a few friends over for dinner tonight. For dessert I decided to try out a new recipe I spotted in All You. This cake had rave reviews and was pretty easy to make. I posted a pic on Facebook and a lot of people asked for the recipe, so here it is...

Molten Chocolate-Nutella Pudding Cakes

  • YIELD: Serves 6
  • PREP TIME:
  • BAKE: 30 MINUTES
  • COST PER SERVING:$1.12
  • COURSE: Desserts
Ingredients
  • 1/2 cup all-purpose flour
  • 1/2 cup unsweetened cocoa
  • 1/2 teaspoon baking powder
  • 4 ounces semisweet chocolate, finely chopped
  • 8 tablespoons (1 stick) unsalted butter, cut into pieces
  • 4 large eggs
  • 1 teaspoon vanilla extract
  • 1 cup sugar
  • 1/4 teaspoon salt
  • 6 tablespoons Nutella
Preparation
  • 1. Preheat oven to 350ÂşF. Mist 6 6-oz. ramekins with cooking spray. Place a roasting pan in oven; pour in 1/2 inch of hot water. In a bowl, whisk flour, cocoa and baking powder.
  • 2. Combine chocolate and butter in a microwave-safe bowl; cook on high, stirring once or twice, until almost melted, 1 to 2 minutes. Whisk until smooth. (I only needed to microwave for 1 minute.)
  • 3. In a bowl, with an electric mixer on medium-high speed, beat eggs, vanilla, sugar and salt until pale yellow, about 5 minutes. Beat in melted chocolate mixture. Stir in flour mixture. Spoon half of batter into ramekins. Drop 1 Tbsp. of Nutella into center of each. Cover with remaining batter.
  • 4. Transfer ramekins to roasting pan. Bake until cakes have risen and are cracked on top, about 30 minutes. Let cool for 5 minutes. Serve warm.

Sunday, December 12, 2010

Easy No Bake Thin Mints


Tis the season for cookie exchanges, office potlucks, and holiday parties. If you're like me, it can mean you are on a baking overload. So I thought I'd share an easy no bake cookie that's always a hit for the holidays (or if you're craving Girl Scout Thin Mints on the off season).

You only two ingredients:


•Ritz Crackers (I like using the "hint if salt" Ritz Crackers)
•2 pkgs of Andes Creme de Menthe baking chips (I have tried Nestle's mint and chocolate swirl morsels and they don't melt as easily)

Yields aprox 64 cookies (about 1/2 box of Ritz Crackers)

On med-low heat, place your baking baking chips in a double boiler for melting. If you don't have a double boiler (like me), add a couple of cups of water to a pot and place a heat resistant mixing bowl in the pot.


Slowly you chocolate will melt and stir until completely smooth.


Once your chocolate is smooth, dip your Ritz Cracker covering both sides in chocolate.


Place cookies on foil, parchment paper, or even freezer paper and let it cool for about 5-10 minutes.


Once cooled, peel each cookie off the foil and redip the top of the cookie in chocolate. I suggest that you peel all the cookies first, then redip.


These cookies cool really quickly and you can easily make and plate them in 30 minutes. They also freeze beautifully and taste great right out if the freezer.


Enjoy!

- Posted using BlogPress from my iPhone

Wednesday, September 1, 2010

Cold Food Cravings


For the most part, I haven't had and crazy cravings. No pickles and ice cream or bananas dipped in BBQ sauce. I once saw a show where the pregnant lady craved chalk. Yikes! I can't even imagine. My preggo tastes are actually somewhat norm, but I noticed that I seem to prefer cold foods...sanwiches, salads, fruits, veggies, and smoothies. I especially go through fruit like there's no tomorrow. We once went through 7 cantalopes in a week!

Smoothies are one of my absolute favs right now. I started out buying them, but realized it was more economical for me to make my own. Plus I know exactly what's in my smoothies if I make them myself. Here is my all natural smoothie how-to...

Here's what you need:
•1 large container of organic strawberries
•4 ripe organic bananas
•organic vanilla yogurt
•6 ziploc sandwich baggies

Using a mini muffin pan, I scoop 1 tbsp of yogurt in each cup and throw it in the freezer. It should freeze fairly quickly (maybe in 15-20 minutes). Once frozen, you'll have 24 mini frozen yogurt discs. Keep in the freezer until you are ready to make your baggies. Slice your strawberries and bananas. Each baggie should contain aprox 4-5 strawberries, 1/2 banana, and 4 frozen yogurt discs. Lay each baggie flat and freeze. Laying it flat will keep it from freezing in one big icy chunk.


When you're ready to have your smoothie, you just throw the contents of the baggie and 1 cup of milk (I use organic 2%) in a blender. You can add a shot of honey if you need some extra sweetness. And there you go... Yummy smoothies for the week. I'm not a milk drinker, so this has been a great way for me to get a good dose of calcium.


So before I sign off today, I want to congratulate Lemondrop Marie on her good news! You look so cute in your vintage maternity wear!

I hope everyone has a happy and healthy day!